When your car’s air conditioning stops working, it’s more than just an inconvenience, it’s a full-on war with heat, traffic, and your own rising blood pressure.
But here’s the deal: not every AC problem needs a trip to the mechanic or a big repair bill. A lot of the time, it’s something you can diagnose—and even fix—yourself with a little time, a flashlight, and the right mindset.
Whether your vents are blowing warm, your cabin smells like an old gym bag, or the AC is dead silent, this guide walks you through real fixes. No fluff, no dealership upsell—just step-by-step help so you can beat the heat.
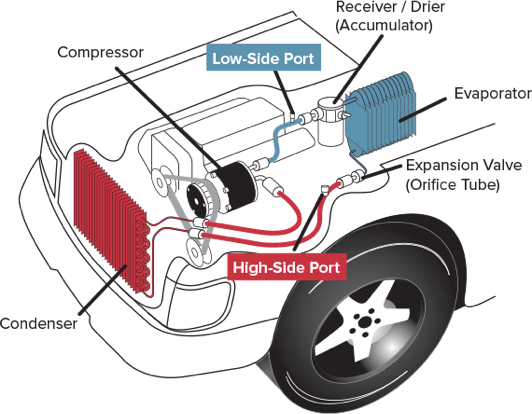
How Your Car’s AC System Works
Think of your AC system like a little weather machine with six key parts:
- Compressor – The muscle that pressurizes and circulates refrigerant. Looks like a metal can with a pulley and lives near your serpentine belt.
- Condenser – Mounted in front of the radiator. This cools the hot refrigerant and turns it back into liquid.
- Expansion valve or orifice tube – Controls how much refrigerant hits the next stop.
- Evaporator – Inside your dash, this part chills the air before it hits your vents.
- Blower motor & cabin air filter – Push air through your system. Dirty filters or weak fans mean weak AC.
- Control panel – Where you twist knobs or tap buttons to change temp, fan speed, or vent direction.
Understanding this layout helps you pinpoint the issue instead of guessing and throwing parts at the problem.
Problem #1: Weak or Barely-There Airflow
What You’ll Notice:
You crank the AC to max, but the air coming out barely rustles your hair. The system’s trying, but nothing’s happening.
Common Causes:
- Clogged cabin air filter
- Failing blower motor
- Bad blower motor resistor
- Blown fuse
- Vent blockage
How to Fix It:
Step 1: Check the fuse
- Grab your owner’s manual and locate the AC or blower fuse (usually 20–30 amps).
- Pull it out and check if it’s blown. Replace with the same amp rating.
Step 2: Inspect or replace the cabin air filter
- Usually behind the glove box—pop it down and look for clips.
- Remove the old filter. Hold it up to the light—if you can’t see through it, toss it.
- Replace it with airflow arrows pointing in the correct direction.
Step 3: Test the blower motor
- Turn the fan on low, medium, and high. If only some speeds work, the resistor is bad.
- If none work and the fuse is good, your blower motor might be toast.
- Listen in the passenger footwell—if you hear a faint hum or rattle, that’s your motor trying to work.

Problem #2: Blowing Air, But It’s Not Cold
What You’ll Notice:
Air’s flowing fine, but it’s warm—or just slightly cooler than outside.
Common Causes:
- Low refrigerant
- Faulty compressor clutch
- Bad expansion valve
- Stuck blend door
- Clogged condenser
How to Diagnose and Recharge:
Step 1: See if the compressor is kicking in
- Pop the hood, start the car, AC on max.
- Watch the center of the compressor pulley—it should engage and spin when AC’s on.
- If it doesn’t, you may have low refrigerant or an electrical issue.
Step 2: Check refrigerant levels
- Grab a can of R-134a with a built-in gauge (AC Pro is beginner-friendly).
- Connect to the low-pressure port (cap is usually blue or black).
- Check the PSI reading—on a warm day (~75°F), aim for 25–45 PSI.
- If it’s low, add refrigerant in 5-second bursts, watching the gauge between.
SAFETY TIP: Wear gloves and eye protection. Refrigerant can cause frostbite. Don’t overfill.

Step 3: Check your blend door
- Adjust the temp from hot to cold—if nothing changes, the actuator might be jammed.
- Listen behind the dash for clicking sounds (a dead giveaway for a broken actuator).
Problem #3: Funky Smells from the Vents
What You’ll Notice:
AC kicks on and your cabin smells like a locker room or damp basement.
Common Causes:
- Mold or mildew in the evaporator or vents
- Dirty cabin filter
- Clogged drain line
How to Fix It:
Step 1: Replace the cabin filter
This is often the culprit. Cheap, easy, and part of your regular maintenance anyway.
Step 2: Spray AC cleaner into the intake
- Find the fresh air intake (near the base of your windshield).
- Set AC to high, recirculation OFF.
- Spray in the cleaner—follow the can’s directions.
- Switch to recirculation ON for 10 minutes to flush it through.
Step 3: Dry the evaporator
- Before you turn the car off, switch AC OFF, fan ON high.
- Run the fan for 5 minutes to blow moisture off the coils.
Bonus Tip: Check under the passenger side floor for dampness. If it’s wet, see the next section.

Problem #4: Water in the Footwell
What You’ll Notice:
Wet carpet on the passenger side, even when it hasn’t rained.
Common Causes:
- Blocked evaporator drain tube
- Leaky heater core
- Clogged sunroof drains
- Bad windshield seal
How to Clear It:
Step 1: Run the AC for 10+ minutes
- Look under the passenger side of your car.
- You should see water dripping from a rubber tube. If not—clog alert.
Step 2: Unclog the drain
- Find the drain tube and gently feed a piece of weed whacker line or plastic zip tie into it.
- Or, blast it with low-pressure compressed air.
Step 3: Rule out other leaks
- Pour water around the windshield and sunroof while a buddy watches inside.
- If the cabin gets wet, the seal’s the problem.
Problem #5: AC Is Noisy or Rattling
What You’ll Notice:
Squealing belts, grinding compressors, or general racket when AC kicks in.
Common Causes:
- Loose or worn serpentine belt
- Debris in condenser fan
- Dying compressor
- Failing bearings
What to Check:
Belt Condition:
- Pop the hood, inspect the belt for cracking or glazing.
- Press midway between pulleys—it should flex about half an inch.
- If it squeals, try belt dressing or consider replacing.
Compressor Mounting:
- Check for loose bolts.
- Rattling on startup might mean the clutch is failing.
Fan Function:
- Fans should kick on with the AC.
- No fan = no airflow over the condenser = no cold air.
Quick Reference: Winners and Watchouts
| Problem | Fastest Fix | Professional Job? |
|---|---|---|
| Weak Airflow | Replace cabin filter | Only if blower motor fails |
| Warm Air | Recharge refrigerant, check clutch | Yes, if compressor is dead |
| Bad Smell | Filter + spray intake cleaner | No, DIY-friendly |
| Water Inside | Clear evaporator drain | Only if core/heater leaks |
| Noisy AC | Check belt and compressor mounts | Yes, for internal failures |
Step-by-Step Diagnostic and Repair Guide
Safety Precautions (IMPORTANT):
- Wear safety glasses and gloves when handling any AC components
- Work in a well-ventilated area (preferably outdoors)
- Never allow refrigerant to contact skin (can cause frostbite)
- It’s illegal in most places to intentionally release refrigerant into air
- Disconnect car battery before working on electrical components
- Never remove pressurized AC lines or components (serious injury risk)

Basic Tools You’ll Need:
- Screwdrivers (Phillips and flat-head)
- Flashlight or work light
- Basic refrigerant gauge kit (if checking/adding refrigerant)
- Safety glasses and gloves
- Your vehicle’s owner’s manual
Advanced AC Diagnostics for the DIY-Inclined
If you’ve already knocked out the basics—checked your fuses, filters, and refrigerant levels—and your AC still isn’t behaving, it might be time to go deeper. These next-level diagnostic steps are for those who are comfortable turning a wrench and don’t mind getting a little technical under the hood.
1. Full-System Refrigerant Pressure Check (Manifold Gauge Method)
If you’re not just guessing but want real data, a manifold gauge set is your best friend. These give you both low- and high-side pressure readings so you can pinpoint leaks, blockages, or an overcharged system.
Here’s how to do it:
- Pick up a basic AC manifold gauge set ($30–$60 at any decent auto parts store).
- With the car off, connect:
- Blue hose to the low-pressure port (small pipe, usually near firewall).
- Red hose to the high-pressure port (larger pipe, often up front).
- Start the engine, turn the AC on MAX cold, fan speed high, windows down.
- Let it run for 5–10 minutes to stabilize.
What to look for:
- Low side (blue gauge): Should read 25–45 PSI, depending on outside temp.
- High side (red gauge): Should read 200–250 PSI.
Both low? Probably a refrigerant leak.
High side off the charts? You could have a blockage, a stuck expansion valve, or an overcharged system.
Low on one, high on the other? Classic signs of a compressor or metering device problem.

2. Leak Detection Using UV Dye
If your system keeps losing charge, you likely have a leak—and they’re not always visible to the naked eye. That’s where UV dye kits come in.
Step-by-step:
- Pick up a kit with dye + injector + UV light ($15–$30).
- Add dye to the low-pressure service port.
- Run the AC for 15–20 minutes.
- Turn off the car and scan all lines, joints, and components with the UV light.
A yellow-green glow = your leak point. Common leak spots include:
- Compressor seals
- O-ring joints
- Schrader valves
- Condenser corners
- Evaporator core (if you smell it but can’t see it)
If you find a leak, you’ll need to replace the faulty component and have the system evacuated and recharged.
3. Inspect the Cooling Fans
Your condenser can’t do its job if the fans aren’t running—and that’ll kill cold air production at idle.
Here’s what to check:
- Start the engine with AC at max.
- After a minute or two, look through the grille at the radiator fans.
- They should be spinning. If not:
- Check the fan relay or fuse.
- Verify the fan motor wiring for damage.
- Apply 12V directly to the fan motor to test if it’s alive.
No fans = overheated condenser = pressure spike = no cold air.
Best DIY Refrigerant Products That Don’t Suck
Choosing the right refrigerant kit can make or break your DIY fix. Here’s what actually works (and why):
| Product Name | Best For | Notes |
|---|---|---|
| AC Pro R-134a Recharge Kit | Beginners | Gauge included, easy-to-follow instructions, includes leak sealer |
| Interdynamics EZ Chill | Budget DIYers | Cheaper, comes with gauge, no sealants |
| A/C Pro Ultra Synthetic | Full DIY setup | Includes refrigerant + oil + hose; great all-in-one kit |
| ZeroR R-134a Replacement | Eco-conscious users | Lower global warming potential, safe for systems after 1995, usually no gauge |
| Supertech R-134a | Bare-bones approach | Lowest price, but you’ll need to buy a separate gauge kit |
WARNING: If your car was built after 2018, it might use R-1234yf—a newer, more expensive refrigerant. R-134a and R-1234yf are NOT interchangeable. Check your under-hood label or owner’s manual.
Maintenance Tips for Optimal AC Performance
Keeping your AC system healthy is a mix of common sense and consistent upkeep. Here’s your maintenance checklist:
Run It Monthly
Even in winter, run your AC for 10 minutes once a month. It keeps oil circulating and seals from drying out.
Keep It Debris-Free
- Clean condenser fins once a season with a soft brush or low-pressure hose.
- Keep leaves and junk out of the fresh air intake.
- Replace the cabin air filter every 15,000–25,000 miles or once a year.
Summer Startup Checklist
- Run AC on max, windows down, full blast for 10 minutes.
- Air should blow under 45°F at the vents.
- Make sure water is dripping under the car from the drain tube.
- Listen for odd clicks, clunks, or squeals.
When to Call in the Pros
Some jobs are worth tackling yourself—but others? Best left to someone with a recovery tank and an EPA license.
See a pro if:
- Your system holds zero pressure (massive leak).
- The compressor clutch doesn’t engage despite proper refrigerant levels.
- You see metal shavings or oily residue around AC parts.
- You need a full evacuation, vacuum, and recharge.
- You’re dealing with R-1234yf (requires special tools and refrigerant).