Dealing with a malfunctioning car air conditioning (AC) system can be frustrating, especially during warm weather. While some issues may require professional attention, many common problems can be diagnosed and addressed with a bit of knowledge and effort.
Introduction to Your Car’s AC System
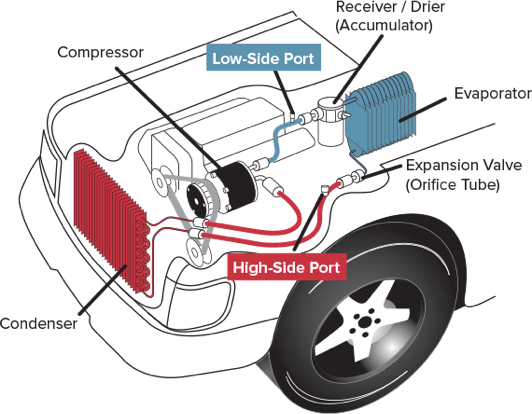
Your car’s air conditioning system isn’t a single unit but rather a collection of components distributed throughout your vehicle:
- Compressor: Usually mounted on the engine with a belt. It looks like a metal pump about the size of a coffee can with a pulley wheel on the front that spins when engaged. This is the “heart” of your AC system that pressurizes the refrigerant.
- Condenser: Located in front of your radiator behind the front grille. It resembles a small radiator with thin fins and tubes running through it, where hot refrigerant cools down.
- Evaporator: Hidden behind your dashboard. This component, similar in appearance to a small radiator, is where the cold refrigerant absorbs heat from your cabin air.
- Expansion valve/orifice tube: Located between the condenser and evaporator, this small device regulates refrigerant flow. It’s typically not visible without removing other components.
- Cabin air filter: Typically behind your glove compartment. It’s a rectangular filter similar to a home air filter that traps dust and debris.
- Control panel: The knobs/buttons on your dashboard that allow you to control temperature, fan speed, and airflow direction.
Common Car AC Issues and How to Address Them
1. Weak Airflow
How to identify: Air barely comes out of the vents when AC is on maximum.
Potential Causes:
- Clogged cabin air filter
- Malfunctioning blower motor
- Obstructions in the ventilation system
- Blown fuse controlling the blower
- Faulty blower resistor (controls fan speeds)

Step-by-step solution:
Check the fuse first (easiest fix):
- Locate your car’s fuse box (check your owner’s manual for exact location)
- Find the fuse labeled for the blower/fan/AC (typically 20-30 amp)
- If blown, replace with same amperage fuse
Inspect the cabin air filter:
- Check your owner’s manual for exact location (usually behind glove box)
- Open glove box completely
- Look for clips or tabs on sides or top of glove box
- Press these clips/tabs inward while lowering the glove box
- You should see a plastic cover with clips or screws
- Remove the cover and pull out the filter
- Hold it up to light – if you can’t see light through it, it needs replacement
- When installing new filter, ensure the airflow direction arrow points correctly
Test the blower motor:
- Turn ignition to “on” position
- Set fan to different speeds
- If some speeds work but others don’t, likely a bad blower resistor
- If no speeds work but you checked the fuse, the motor may be faulty
- Listen near the passenger side footwell for motor hum

2. Warm Air Blowing from Vents
How to identify: System blows air, but it’s not cold.
Potential Causes:
- Low refrigerant levels
- Faulty compressor
- Issues with the condenser
- Failed expansion valve/orifice tube
- Stuck blend door (controls temperature mixing)
Step-by-step inspection:
Check if compressor is engaging:
- Park on level ground and open the hood.
- Start the car and set AC to maximum cooling.
- Look at the compressor (round or oval object with a belt)
- The center part (clutch) should be spinning when AC is on
- If not spinning, could be electrical problem or low refrigerant
Check refrigerant levels (basic method for beginners):
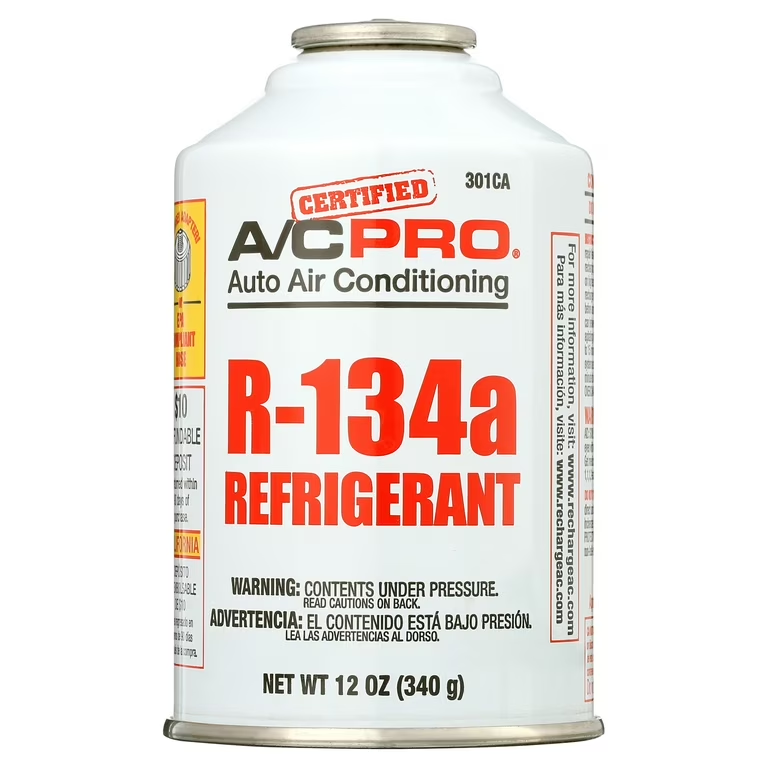
- Purchase a refrigerant can with built-in gauge (like AC Pro) from auto parts store ($20-40)
- With car running and AC on maximum:
- Locate the low-pressure service port (usually has a blue or black plastic cap)
- Remove the cap and connect the gauge
- Read the pressure and compare to temperature chart on the can
- Generally, on a 75°F day, pressure should be around 25-45 PSI
- Lower pressure indicates low refrigerant

Add refrigerant if needed:
- With gauge connected and car running with AC on max:
- Follow instructions on the refrigerant can exactly
- Add refrigerant in short 5-second bursts
- Check the gauge between bursts
- Stop when gauge reads in the normal range
- SAFETY NOTE: Work in well-ventilated area and wear gloves to prevent frostbite

Check for temperature control issues:
- Adjust temperature knob between hot and cold
- If no change occurs, may have blend door actuator problem
- Listen for clicking behind dashboard when changing temperature settings
3. Unpleasant Odors
How to identify: Musty or stale smell when AC runs.
Potential Causes:
- Mold or mildew buildup
- Wet floor mats
- Clogged evaporator drain
- Debris in ventilation system
Step-by-step solution:
Replace cabin air filter (see steps above)
Use AC system cleaner:
- Purchase AC system cleaner spray from auto parts store ($5-15)
- Locate your car’s fresh air intake (usually at base of windshield near wipers)
- Turn car on with AC running on high, with “recirculation” turned OFF
- Spray cleaner into the fresh air intake following product instructions
- Turn AC to “recirculate” mode for 5-10 minutes
- Turn off car and let sit for 15 minutes before using again
Dry out the system:
- Before turning off your car, switch AC compressor off but leave fan running
- Run the fan on high for 5 minutes to dry out evaporator
- Check under floor mats for dampness and dry if needed
Check evaporator drain:
- With AC running for 10+ minutes, look under the passenger side of car
- You should see water dripping from a small tube
- If no water appears, the drain may be clogged
- Locate the drain tube and clear with gentle wire probe or compressed air

4. Noisy Operation
How to identify: Squealing, grinding, or rattling when AC is running.
Potential Causes:
- Debris in the system
- Failing compressor
- Worn-out bearings in pulleys or fans
- Loose mounting brackets
- Low refrigerant causing compressor strain
- Worn drive belt
Step-by-step diagnosis:
Identify the type and timing of noise:
- Squealing: Often indicates belt issues
- Rattling: Usually loose components
- Grinding: Suggests internal damage
- Only at startup: Could be clutch engagement issue
- Constant: Possibly bearing or internal component
Check belt condition:
- Locate the serpentine belt that drives the compressor
- Look for cracks, fraying, or glazed appearance
- Check tension by pressing on longest exposed section (should deflect about ½ inch)
- If belt looks worn or is loose, consider replacement
Inspect compressor mounting:
- Locate the compressor mounting bolts
- Check if they appear loose
- If accessible, try to gently tighten (do not overtighten)
Check for debris:
- Inspect the condenser fins at front of car
- Remove any leaves, bugs, or debris with soft brush or low-pressure water
5. Water Stains Inside Vehicle
How to identify: Wet carpet on passenger side floor.
Potential Causes:
- Blocked condensate drain tube
- Damaged heater core
- Windshield seal leaks
- Clogged sunroof drains
Step-by-step diagnosis and solution:
Determine the source:
- Note when water appears (only with AC use or also during rain)
- Feel the wetness – coolant leaks feel sticky and have sweet smell
- Clear water with no smell is likely AC condensation
Locate and clear the AC drain:
- Look under the passenger side of car
- Find the small rubber tube extending downward
- With car running and AC on for 15 minutes, check for water dripping
- If no water drips, the tube may be clogged
- Use a piece of flexible wire to gently clear the tube
- Alternatively, use compressed air to blow through the tube
Check for other leaks:
- Inspect windshield seals for damage
- If sunroof equipped, check sunroof drain tubes
- Test by pouring small amount of water around suspected areas while someone watches inside
Step-by-Step Diagnostic and Repair Guide
Safety Precautions (IMPORTANT):
- Wear safety glasses and gloves when handling any AC components
- Work in a well-ventilated area (preferably outdoors)
- Never allow refrigerant to contact skin (can cause frostbite)
- It’s illegal in most places to intentionally release refrigerant into air
- Disconnect car battery before working on electrical components
- Never remove pressurized AC lines or components (serious injury risk)

Basic Tools You’ll Need:
- Screwdrivers (Phillips and flat-head)
- Flashlight or work light
- Basic refrigerant gauge kit (if checking/adding refrigerant)
- Safety glasses and gloves
- Your vehicle’s owner’s manual
Advanced Diagnostic Procedures (for those comfortable with car repairs):
1. Full Refrigerant Level Check:
- Purchase a manifold gauge set ($30-60 at auto parts stores)
- Identify both high (red) and low (blue) service ports
- Connect blue hose to low side, red hose to high side
- With engine running and AC on maximum:
- Low side should read 25-45 PSI (varies with ambient temperature)
- High side should read 200-250 PSI
- Low readings on both indicate refrigerant leak
- High readings suggest blockage or overcharge
2. Detect Refrigerant Leaks:
- Look for oily residue around connections and components
- For thorough detection, consider a UV dye kit ($15-30):
- Add UV dye to system following kit instructions
- Run AC for 15-20 minutes to circulate
- Use UV light (included in kit) to inspect all components
- Yellow-green glow indicates leak locations
3. Inspect Cooling Fans:
- With engine cool, locate cooling fans behind radiator
- Start engine and turn AC to maximum
- Fans should activate within 1-2 minutes
- If fans don’t run, check fan fuses and relays
- Fan operation is critical for proper condensing
Recommended Refrigerant Products
When selecting a refrigerant product, choose based on your needs:
- AC Pro Car Air Conditioner Synthetic R-134a Refrigerant ($20-30)
- Includes built-in gauge for easier use
- Contains leak sealer for minor leaks
- Good for beginners due to simple instructions
- Interdynamics EZ Chill Refrigerant ($15-25)
- More affordable option
- Includes gauge but no leak sealer
- Simple to use for first-timers

- ZeroR AC Refrigerant R-134a Replacement ($30-40)
- Eco-friendly alternative with lower global warming potential
- Compatible with most systems made after 1995
- May not include gauge – check packaging

- Supertech R-134a Refrigerant ($10-20)
- Basic refrigerant without additives
- Usually requires separate gauge purchase
- Most economical but less beginner-friendly

- A/C Pro Ultra Synthetic A/C Recharge R-134a Kit ($25-35)
- Complete kit with gauge, hose, and additives
- Contains both refrigerant and oil for compressor
- Best all-in-one solution for DIY repairs

IMPORTANT NOTE: Newer vehicles (generally 2018 and newer) may use R-1234yf refrigerant instead of R-134a. Check your owner’s manual or look for labels under the hood. These refrigerants are NOT interchangeable.
Maintenance Tips for Optimal AC Performance
- Regular Operation: Run the AC for 10 minutes at least once a month, even in winter. This circulates oil through the system and keeps seals lubricated.
- Keep It Clean:
- Replace cabin air filter every 15,000-25,000 miles or as recommended
- Clean the condenser fins of debris using soft brush or low-pressure water
- Keep the area around fresh air intake clear of leaves and debris
- Annual Check: At the start of summer, perform this quick check:
- Run AC on maximum cooling for 10 minutes
- Air should be cold (below 45°F at the vent)
- Check for water dripping under car (normal operation)
- Listen for unusual noises
- Professional Service When Needed:
- Have system evacuated and recharged every 3-5 years
- If system completely loses charge, have it professionally checked
- Annual professional inspection can catch problems early
By following this guide, you can address many common car AC problems, ensuring a comfortable driving experience. Always prioritize safety and consult a professional if you’re uncertain about any procedures or if issues persist after your DIY attempts.